VirtualBox 配置虚拟网卡(桥接),实现主机-虚拟机网络互通(图文教程)
(编辑:jimmy 日期: 2025/1/11 浏览:3 次 )
网上搜出来的比较乱,讲的不明不白,因此根据自己弄过一次,确认可行的方式,做个备份,方便日后查阅。
环境:
在Oracle VM VirtualBox中安装的Ubuntu,具体版本名是:ubuntu-14.10-server-amd64
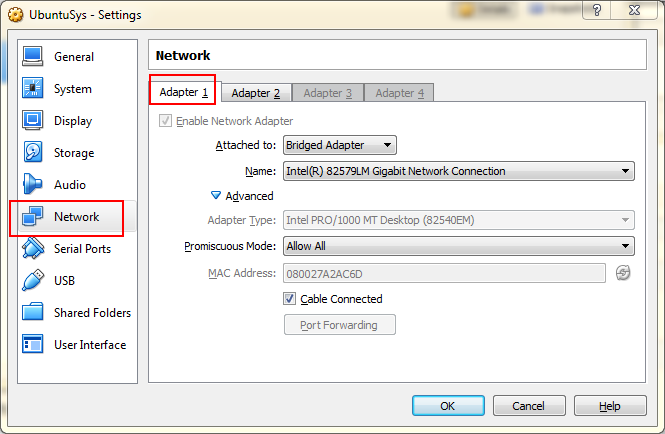
Step1:
Step 2:
虚拟机开机,输入命令:sudo ifconfig或者sudo ifconfig -a查看当前网卡配置
查看当前ip地址
Step3:
输入命令:vim /etc/network/interfaces
打开网卡配置文件,添加eth1,保存修改。修改后的文件内容,如下:
# This file describes the network interfaces available on your system
# and how to activate them. For more information, see interfaces(5).

# The loopback network interface
auto lo
iface lo inet loopback

# The primary network interface
auto eth0
iface eth0 inet dhcp

auto eth1
iface eth1 inet static
#本机当前ip地址,通过Step2中ifconfig查询出来的即可
address 192.168.56.11
netmask 255.255.255.0
Step4:
重启虚拟机(必要时重启主机电脑),命令ifconfig查看当前网卡设置。能看到eth1,并且有值,即可。
Step5:
1) Windows的cmd中,命令:ipconfig查看当前ip
2) ubuntu中,输入命令:ping 192.168.56.1,Enter,显示如下:
虚拟机访问主机ip,通过了。
结果:
至此,虚拟机与主机桥接网卡成功,ip互通,且虚拟机成功通过主机网络访问外网。
ps:关于配置文件一些内容的具体含义,本人没有细究,也并不是太清晰。此文也是事后一段时间,回忆着写的,配置步骤如有遗漏,欢迎指正.
下一篇:详解Nginx HTTP负载均衡和反向代理配置


